


Overview
What is Git?
Git is an open-source version control system, which allows you to keep track of your source files, and the changes you make to them. Using Git, you can roll back to any previous version of a file, and easily collaborate with team members.
Git “lives” on your local computer, and allows you to configure so-called “repositories” that track files and directories.
 Tip
TipStoring sensitive data
Git will eventually become the long-term memory of your project, and you may decide to make the repository public so others can learn from or use your work. Therefore, it is crucial that you do not store any sensitive information in your source code (e.g., API credentials, passwords).
What is GitHub?
You can optionally use Git in combination with an online hosting service such as GitHub, which allows you to backup your code, synchronize your work across multiple computers, or collaborate with others on joint projects. There are several alternatives to GitHub available, and maybe your institution even offers its own “Git” services.
On top of the basic features of Git (like versioning), GitHub offers a range of tools that allow you to collaborate with each other more efficiently. A few examples:
- Issues are sort of to-do lists, flavored with a discussion board
- Projects are a sort of Scrum board.
Let’s Use Git!
TipDownload the GitHub cheatsheet!
There is no better summary than this official GitHub cheatsheet. Download it, print it out or put it on your desktop. Consider it as your best friend for a while.
1. Configuring Git on a new computer
(Check cheatsheet → setup)
To use Git locally, tell Git your name and email address, so that any work you do (and potentially sync later) can be linked to your name.
Open Git bash, and type the following commands:


# set the author name for your commits
git config --global user.name "[name]"

# set the author email for your commits
git config --global user.email "[email address]"
2a. Create a repository for a new project
If you would like to start a new project, it’s easiest to start your repository from one of our example projects. Just navigate to a project’s GitHub page, and select Use this template (a green button). Choose a name for your new repository, and proceed with the standard options.
Note down the URL for your repository (e.g., https://github.com/tilburgsciencehub/test-repository), and proceed to step 2c.
2b. Create a repository for an existing project
(Check cheatsheet → setup & init)
Chance is you are already working on a project, and you’d like to adopt Git to start versioning your files from now onwards.
Just navigate to your main project directory, open Git bash, and
type
# initialize a new repository
git init
Then, proceed to step 3.
2c. Clone an existing repository to your local computer
(Check cheatsheet → setup & init)
Your code is already hosted on GitHub, or you’d like to take a sneak preview
of one of the thousands of projects hosted on GitHub? Just note down the
URL of the repository (e.g., https://github.com/[username]/[project-name]),
and clone the repository to your local computer.
# clone an existing repository from Github to local PC
git clone "[url]"
For example, type git clone "https://github.com/rgreminger/example-make-workflow" to clone a copy of the example workflow using R and make (see also the example projects). You can also change the default directory name to which the repository
will be cloned. For example, typing git clone "https://github.com/rgreminger/example-make-workflow my-project will clone the repository to the folder my-project.
Proceed to step 3.
TipIdeally, you use a main project folder on your computer, pretty high-up in your folder hierarchy (e.g., ‘D:/projects/`). While technically feasible, you should avoid storing your Git repositories on Dropbox as this may lead to synchronization conflicts.
3. Work on your project
When working on your project, you do the following two things:
- track changes to your project (e.g., such as adding, removing, or changing source files),
- synchronize your repository with GitHub, so that (a) you make a backup of your changes, and (b) you allow other team members to see your changes, and (c) you see changes that team members (may) have done.
3a. Track your changes
(Check cheatsheet → stage & snapshot)
Now it’s time to start working on your project. “Working” means making changes to files or directories (such as adding, changing, or deleting files or directories).
Typically, you execute this workflow multiple times a day when working on a project. Every time you execute this workflow, you “save” a snapshot of your project that you can roll back to later.
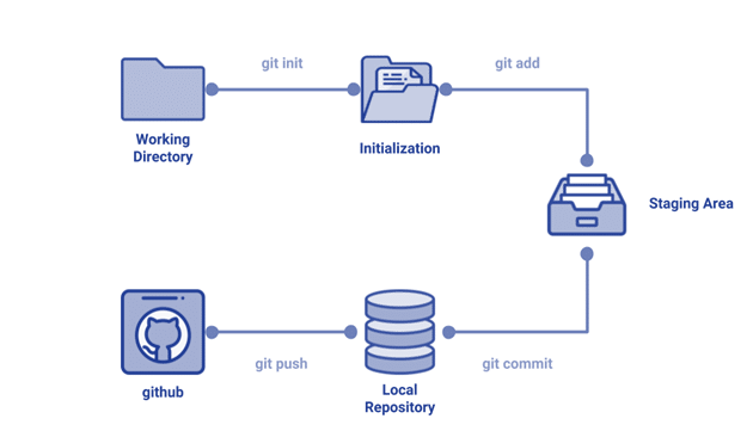
Git separates a “save” operation in two stages: first, files (or directories) can be
gathered on a so-called “staging area” using the command git add. You can use multiple
of these commands after each other. Then, in a second step, the changes are saved - or, in Git terminology - “committed”. The command for this is git commit. See below for an
example, which also adds a few other useful commands.
# show files or directories that were changed (or that still need to be added)
# files that are already in the staging area are green; files that are not
# in the staging area are red.
git status

# add a directory or file to the staging area
git add directory-name-or-file-name
# for example, git add sourcecode.R, or dir-name/sourcecode.R.

# run git status again, to see that the files have "turned green"
git status

# added a wrong file to the staging area, and want it to turn "red" again?
git reset directory-name-or-file-name

# are you happy with what is green in your staging area? Then it's
# time to finalize your save operation by initiating a so-called "commit".
git commit -m "message"
# (give it a clear message, so that you can easily roll back to this version
# of your repository.

# optionally, use git log to see the versioning history
git log
Exclude files from tracking
Experience shows that you want to avoid tracking specific files and folders.
For example, if you recall the directory structure for your
project, there is no point in tracking generated files in /gen, as these
files are purely created based on source code in /src (which, in
turn, you do would like to track).
You can exclude files and directories from tracking by putting a textfile
called .gitignore in your project’s root directory.
Check out a few example .gitignore files for inspiration, or copy-paste
the following to your own .gitignore:
**/rbin/
**/raw/
*RData
*pdf
**/audit
**/input
**/output
**/temp
**/zip
*csv
*xlsx
*~*
*log
*.Rhistory
**/exports
**.ipynb_checkpoints
**__pycache__
*.log
slides/*.gz
slides/*.snm
slides/*.toc
slides/*.nav
slides/*.out
slides/*.aux
.RProfile
3b. Synchronize your changes with a server
(Check cheatsheet → share & update)
Everyone can sync their local changes with the remote repository on GitHub. You can also “download” changes to your local repository from the remote repository.
# (1) DOWNLOAD AND MERGE CHANGES

# download and merge any changes from the remote/GitHub
git pull

# alternatively, you can do the same in two steps:
git fetch # fetches changes
git merge # merges changes with your local files

# (2) UPLOAD CHANGES

# upload all local branch commits to GitHub
git push
4. Branching
(Check cheatsheet → branch & merge)
Branches are key tools for version control. In essence, branches separate the main version of your project (the “master” branch), from any experimental code in which you develop new features.
One team member is in charge of the “master” branch, while everybody else implements new features in feature branches (give them any name you like, but names should be easily understood by anybody in your team).
# create a branch [branch-name]
git branch [branch-name]

# switch to s specific branch [branch-name]
git checkout [branch-name]

# merge a specific branch [branch] to the working branch;
#, e.g., if you're in the master branch, you can integrate
# any changes done in the feature [branch].
git merge [branch]

# delete a specific branch [branch-name]
git branch -d [branch-name]
After integrating changes from a particular branch, you ideally synchronize changes with the remote repository on GitHub.
Summary
Want to know more about how to use Git? Check out the lessons at software carpentry, and make use of the cheatsheet throughout your work. Also, our friends at the University of Zurich have a fantastic tutorial on using Git.
 Summary
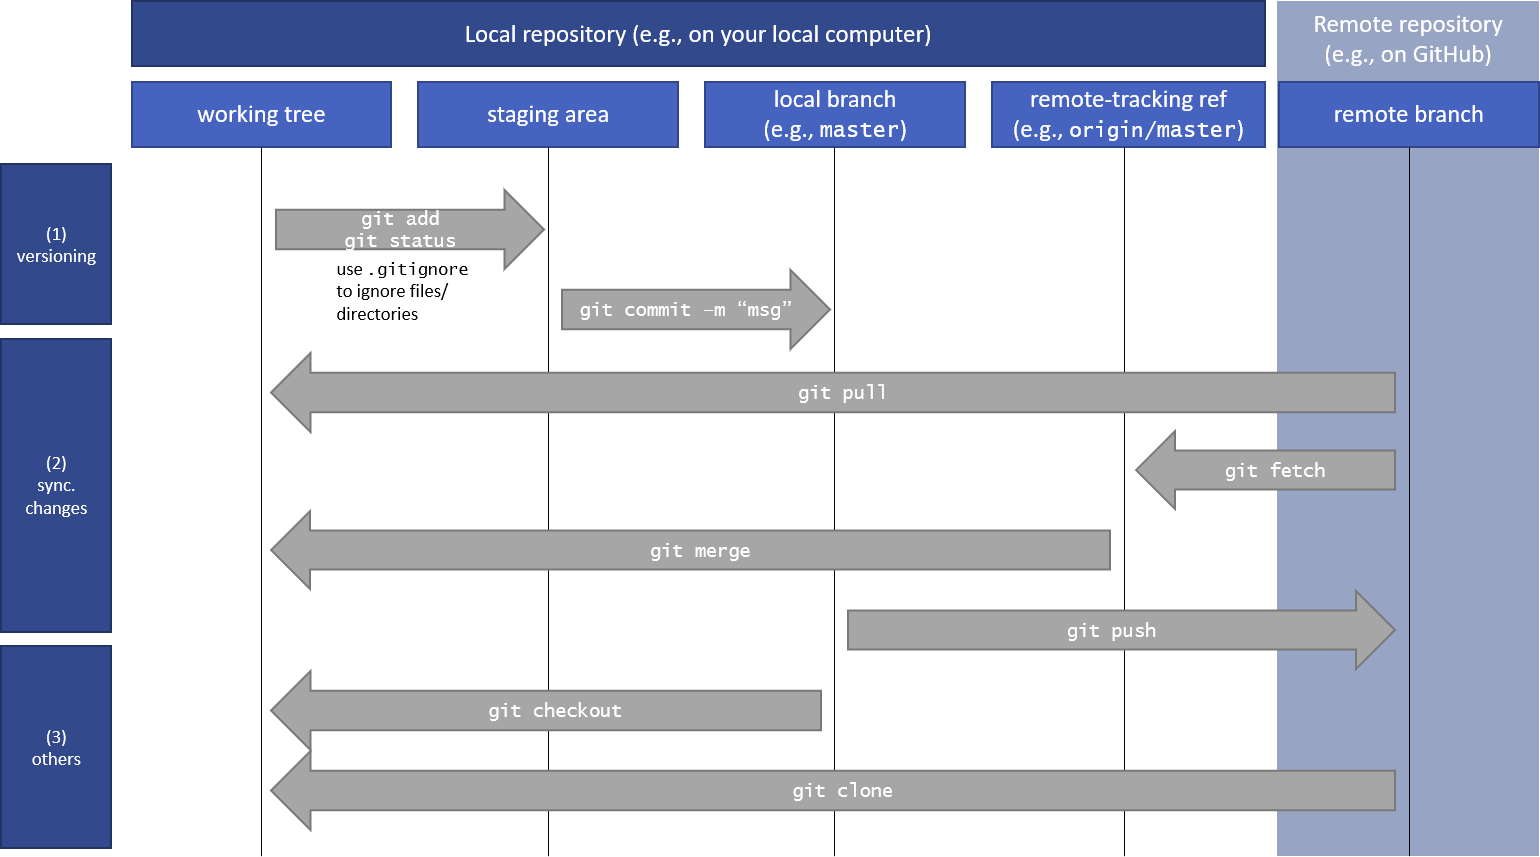
-
We distinguish between local and remote repositories.
- Each project can consist of multiple local repositories, which are stored on one or many computers (e.g., your desktop PC, your laptop, a computer in a cloud, or computers by team members).
- Each project typically has one remote repository (e.g., hosted on GitHub), which is used to backup and synchronize changes between multiple computers.
-
Each project has a “working tree” (your project’s main directory) - by default, all files in that working directory can be tracked.
-
Workflow to version your files
- Run
git statusto see which files are staged (green), and which ones are not (red) - Add files to the ‘staging area’, using the command
git add - Run
git statusto verify you have tracked everything you want. - See files and/or directories that you never want to track? Add those to a
.gitignorefile (typically data files, or generated output files) - Finalize your “save” by running
git commit -m "give yourself a clear message ", which will commit any changes to your project’s history.
- Run
-
Workflow to synchronize changes with a remote repository
- Run
git pull; alternatively, first rungit fetchand thengit merge - Push (
git push) your own local changes to the repository (so that others see your changes)
- Run
-
Other useful commands
- Use
git checkoutto switch branches - Use
git cloneto clone repositories from GitHub
- Use