


Overview
Welcome to this introductory guide for Git and GitHub. In this topic, we'll help you with the essential skills to start using Git for version control and start collaborating effectively on coding projects.
The topic consists of the following sections:
- What is Git?
- What is GitHub?
- Configuring Git on a new computer
- Creating or joining repositories
- "Workcycles" to track your changes
- Branching
By the end of this topic, you'll have a solid grasp of Git and GitHub, empowering you to manage code versions and collaborate confidently with fellow developers.
What is Git?
Git is an open-source version control system that allows you to keep track of your source files, and the changes you make to them. Using Git you can roll back to any previous version of a file, and easily collaborate with team members. Git runs on your computer and allows you to configure so-called repositories that track files and directories. Use our topic Set up Git and Github to install Git and Github!
What is GitHub?
You can optionally use Git in combination with an online hosting service such as GitHub, which allows you to back up your code, synchronize your work across multiple computers, or collaborate with others on joint projects. There are several alternatives to GitHub available, and maybe your institution even offers its own "Git" services.
On top of the basic features of Git (like versioning), GitHub offers a range of tools that allow you to collaborate more efficiently. A few examples are:
- Issues are like to-do lists, flavored with a discussion board.
-
Projects are akin to a Scrum board. It facilitates project management, allowing for task allocation and progress tracking.
 Tip
TipFor starters... If you've never worked with Git or GitHub before, we recommend you follow this interactive onboarding tutorial.
For more advanced learners... There is no better summary of using Git and GitHub than this official cheatsheet. Download it, print it out, or put it on your desktop. Consider it as your best friend for a while.
Configuring Git on a new computer
To use Git on your local machine, tell Git your name and email address. This way, any work you do (and potentially sync later) can be linked to your name.
Open Git bash, and type the following commands:

# Set the author name for your commits
git config --global user.name "[Your Name]"

# Set the author email for your commits
git config --global user.email "[your.email@example.com]"
This ensures every contribution you make is uniquely recognized and properly linked to you.
Creating or joining repositories
Git organizes your code in so-called repositories. You can either create a repository for new or existing projects or join existing repositories. Keep on reading to find out how.
Create a new repository for a new project
If you would like to start a new project, it's easiest to start your repository from one of our example projects.
- If it is a template project, navigate to a project’s GitHub page, and select Use this template (a green button). Choose a name for your new repository, and proceed with the standard options. Note down the URL for your repository (e.g.,
https://github.com/tilburgsciencehub/test-repository).
For example, this example-make-workflow can be used as a template directly:
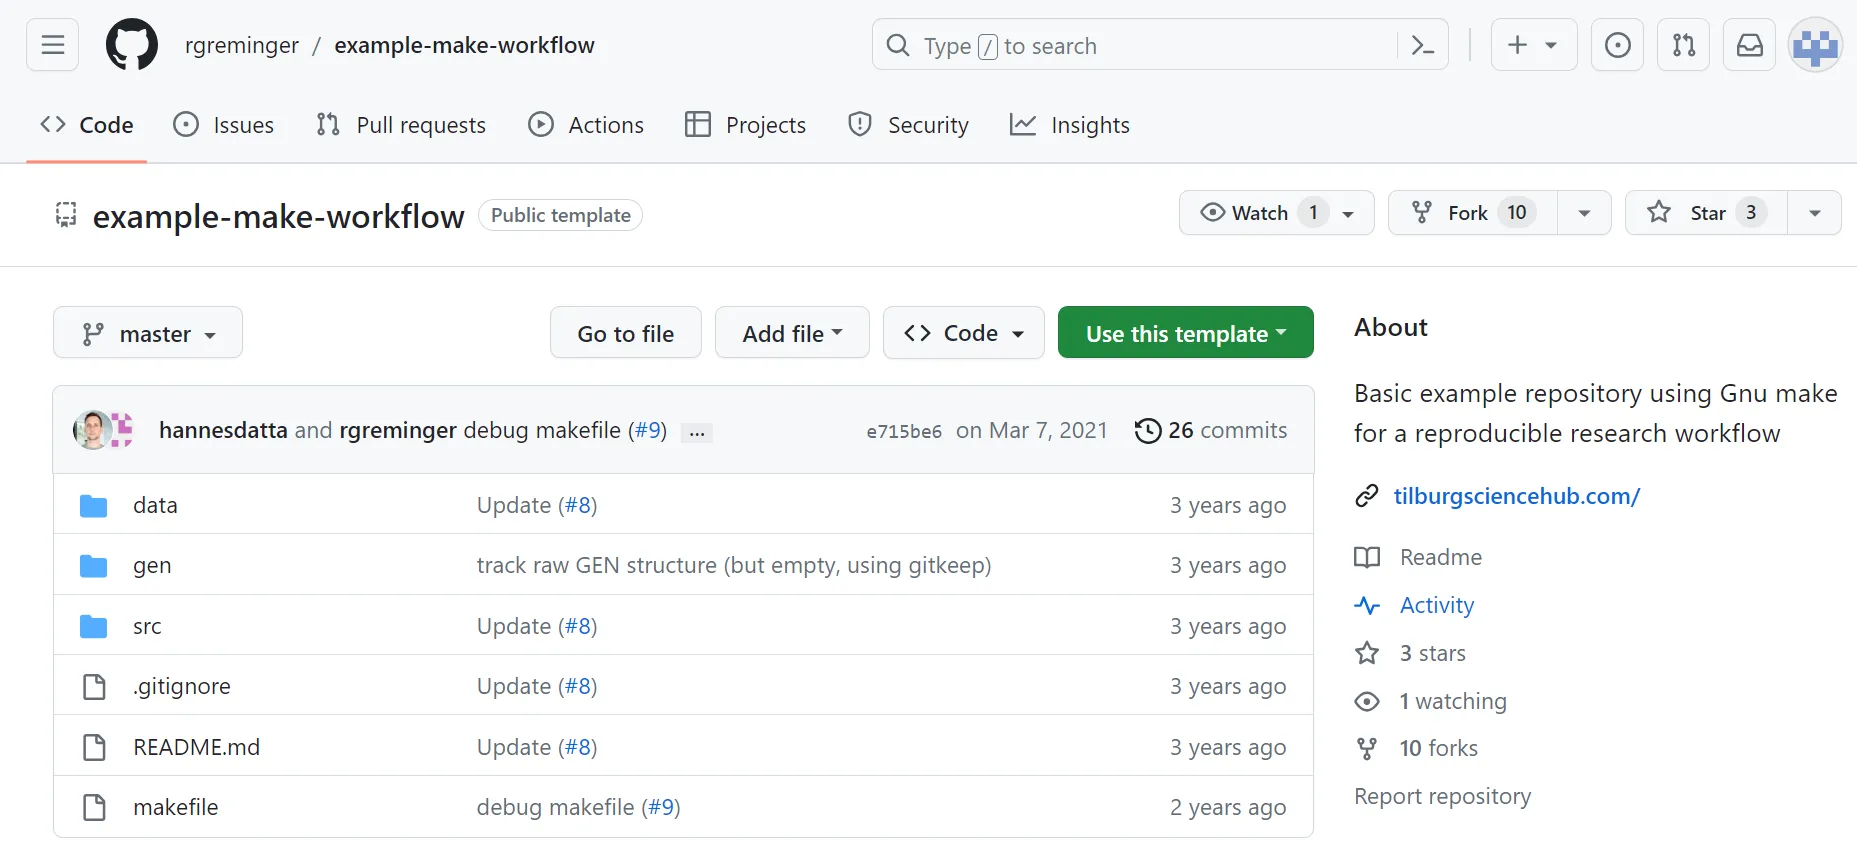
- If it is not a template project, you can fork the repository. Forking creates your copy of a repository. For example, this example workflow can be forked with the "fork" button on the upper right of the page:
Create a new repository for an existing project
The chance is you are already working on a project, and you'd like to adopt Git to start versioning your files from now onwards.
Just navigate to your main project directory, open Git bash, and
type
# initialize a new repository
git init
Clone an existing repository to your local computer
If you already have your own GitHub repository or have become a member of the GitHub repository of a team member, you can just "clone" these repositories to your local computer.
bash
# clone an existing repository from Github to local PC
git clone "[url]"

# clone an existing repository, and specify name of target directory on local PC
git clone "url" my-project # will clone the repository to the folder `my-project`.Cloning to start with example code
Cloning is a fantastic way to use the work of others to start your own. For example, you can type git clone "https://github.com/rgreminger/example-make-workflow" to clone a copy of the example workflow using R and make (see also the example projects).
You can also take a sneak preview of one of the thousands of projects hosted on GitHub. Just note down the
URL of the repository (e.g., https://github.com/[username]/[project-name]), and clone the repository to your local computer.
TipStoring repositories best practices
- Avoid storing your project deep within many sub-directories, but rather higher up in your folder hierarchy (e.g. 'D/projects'). This is because Git Bash cannot handle file paths over a certain number of characters.
- Avoid complicated directory names, so you can navigate quickly to them. In this example, the folder is named
my-project. - Avoid storing your Git repositories on Dropbox or Drive as this may lead to synchronization conflicts.
"Workcycles" to track your changes
When working on your project, you do the following two things:
- Make changes to your project (e.g., such as adding, removing, or changing source files),
- Synchronize your repository with GitHub, so that (a) you make a backup of your changes, (b) you allow other team members to see your changes, and (c) you see changes that team members have done.
Track your changes
-
Now it's time to start working on your project. "Working" means making changes to files or directories (such as adding, changing, or deleting files or directories).
-
Typically, you execute this workflow multiple times a day when working on a project. Every time you execute this workflow, you "save" a snapshot of your project that you can roll back to later.
-
Git separates a "save" operation into two stages: first, files (or directories) can be gathered on a so-called "staging area" using the command
git add. You can use multiple of these commands after each other. Then, in a second step, the changes are saved - or, in Git terminology - "committed". The command for this isgit commit. See below for an example, which also adds a few other useful commands.
# show files or directories that were changed (or that still need to be added)
# files that are already in the staging area are green; files that are not
# in the staging area are red.
git status

# add a directory or file to the staging area
git add directory-name-or-file-name
# for example, git add sourcecode.R, or dir-name/sourcecode.R.

# run git status again, to see that the files have "turned green"
git status

# added a wrong file to the staging area, and want it to turn "red" again?
git reset directory-name-or-file-name

# are you happy with what is green in your staging area? Then it's
# time to finalize your save operation by initiating a so-called "commit".
git commit -m "message"
# (give it a clear message, so that you can easily roll back to this version
# of your repository.

# optionally, use git log to see the versioning history
git log
Exclude or remove files from tracking
Want to avoid tracking specific files and folders from versioning? For example, there is no point in tracking generated files in /gen, as these files are purely created based on source code in /src (which, in
turn, you do would like to track). Also, large data sets shouldn't be versioning, given the upload limit at GitHub. Learn how to exclude files and directories from tracking in this topic.
Similarly, you should not store any sensitive information (such as passwords or API keys) in your code. Similarly, you may have accidentally committed a large data set and would like to take it out of the repository entirely. This topic teaches you how to remove sensitive or large files from your repository.
Synchronize your changes with a server
Everyone can sync their local changes with the remote repository on GitHub. You can also "download" changes to your local repository from the remote repository.
# (1) DOWNLOAD AND MERGE CHANGES

# download and merge any changes from the remote/GitHub
git pull

# alternatively, you can do the same in two steps:
git fetch # fetches changes
git merge # merges changes with your local files

# (2) UPLOAD CHANGES

# upload all local branch commits to GitHub
git push
Branching
Branches separate the main version of your project (the "main" branch) from any experimental code in which you develop new features. Branches allow team members to make changes to the project without immediately affecting the main version of the project.
We provide an introduction to branching and branch naming strategies in additional topics:
- Git Branching Strategies. This topic explains several Git Branching Strategies and its own set of advantages and disadvantages.
- Best Practices for Naming Git Branches. This topic covers useful practices for naming branches to ensure a clear and structured repository.
Valuable links
Continue expanding your Git and GitHub knowledge with these valuable links:
- Lessons at Software Carpentry: Free tutorials covering various programming and version control concepts, including Git and GitHub.
- GitHub Cheatsheet: An essential cheat sheet to swiftly access and master crucial Git and GitHub commands.
- Tutorial on using Git at the University of Zürich: A tutorial offering insights and practical guidance on using Git for version control.
- Introduction to Git: An introductory interactive DataCamp course to grasp the fundamentals of Git version control, perfect for beginners.
-
GitHub Concepts: A DataCamp course that can help you enhance your understanding of GitHub's core concepts and functionalities, and provides insights into collaborative coding, project management, and more.
 Summary
In this topic, you've gained essential skills to use Git and GitHub for efficient version control and collaboration on coding projects.
The following points summarize this topic:
- Git is an open-source version control system that enables tracking of source files and changes. It allows you to revert to previous file versions and collaborate seamlessly with team members.
- GitHub is an online hosting service that complements Git, providing features like code backup, synchronization across devices, and collaborative project work. GitHub offers additional tools such as issues for task management, and projects for organized project management.
- You can set up Git on your local machine by configuring your name and email address.
- Git organizes your code in repositories. You can either create a repository for new or existing projects or join existing repositories.
- Branches allow the development of new features without affecting the main project.