Overview
In this building block, you will discover how to create and configure a simple and robust VM instance in Google Cloud, designed to overcome power constraints. Say goodbye to obstacles and embrace seamless computing!
After going through this guide, you’ll get more familiar with:
- Establishing a VM instance in Google Cloud with optimized configurations.
- The usefulness of Docker in combination with cloud virtual machines.
- NVIDIA drivers to access GPU power.
Initialize a new instance
Create a Google Cloud account
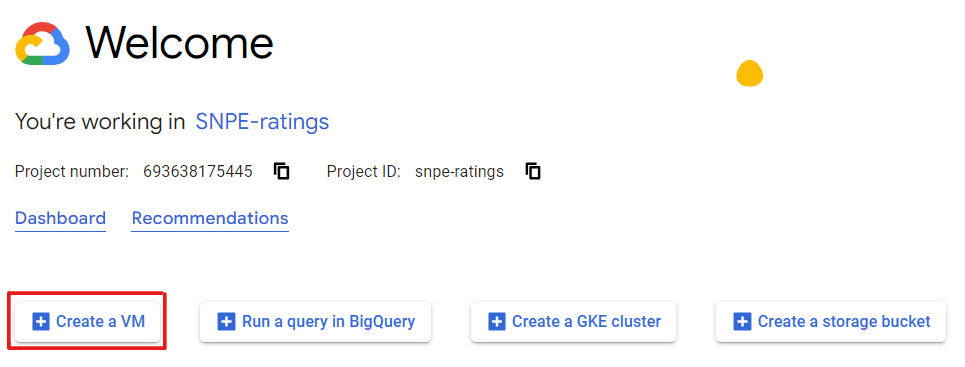
First of all, we will need to have a Google Cloud account and a project created to create a virtual machine instance. After this is done, we can go to the welcome page and click on “Create a VM”.
Set up your Virtual Machine
You will be directed to the instance configuration page. Here, you will need to enter details for your instance. This includes the instance name, labels, region, zone, and machine configuration.
Select your best option
You’ll encounter four primary machine categories to select from:
-
General Purpose: Offers the best balance between price and performance, making it suitable for a wide range of workloads. It provides a cost-effective solution without compromising efficiency.
-
Compute-optimized: Delivers the highest performance per core on Compute Engine, specifically designed for compute-intensive tasks. It excels in scenarios that require substantial computational power, ensuring faster processing and reduced execution times.
-
Memory-optimized: Specifically designed for memory-intensive workloads, this category offers a higher memory capacity per core compared to other machine families. With the ability to support up to 12 TB of memory, it empowers applications that heavily rely on data storage and manipulation, enabling efficient data processing and analysis.
-
Accelerator-optimized (GPUs): The perfect choice for massively parallelized Compute Unified Device Architecture (CUDA) compute workloads, such as machine learning and high-performance computing. This category is specifically tailored for workloads that demand GPU acceleration, ensuring exceptional performance for tasks that require substantial graphical processing power and parallel computing capabilities.
 Warning
Save on unnecessary costs!
GPU-enabled VMs are vital for deep learning tasks like language models. However, for other uses, GPUs are redundant and increase expenses.
See an example of how suboptimal GPU usage can slow compute time here.
In case you are unsure, a good choice to balance between price and performance would be to select an NVIDIA T4 n1-standard-8 machine. It’s packed with 30GB of RAM and a GPU. If we would need more vCPUs or memory, we can improve it by selecting a customized version, under the “Machine type” header.
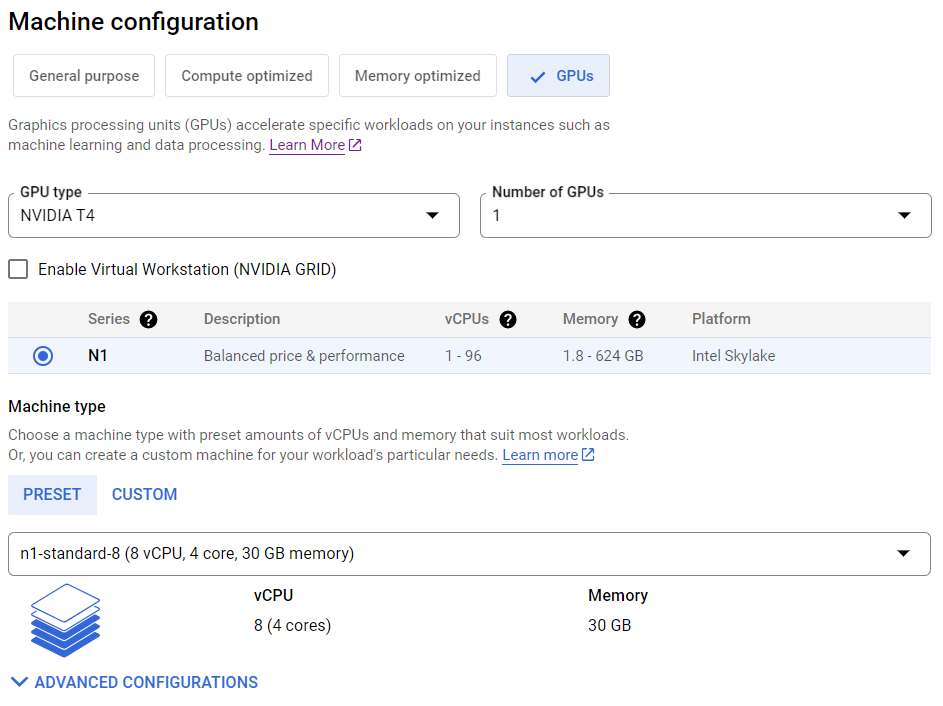
While we won’t dive into all the configuration bells and whistles here, remember Google Cloud is your playground for custom-tailoring your instance just the way it better suits your needs.
 Tip
TipBalance your budget and computational needs
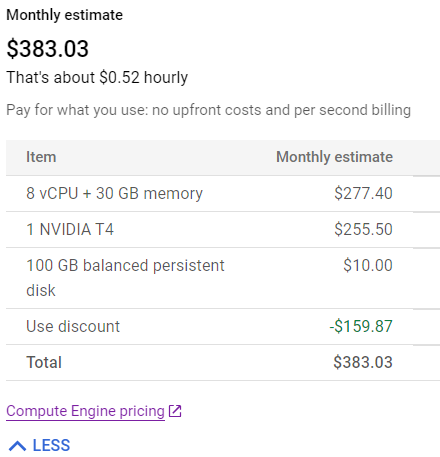
In the top right corner, you’ll see a real-time pricing summary. As you adjust your instance’s configuration, you’ll be able to find the optimal setup that suits your specific requirements.
Boot disk settings
As we scroll down through the configuration process, we’ll skip to Boot Disk settings.
Think of your boot disk as your instance’s storage locker - here, you get to pick its type (standard or SSD), size, and the VM image (Operating System) you want to load on it.
A bigger boot disk equals more space for data and apps. So, if you’re playing with chunky datasets, you’ll want to upgrade your storage. In our case, we’ll crank up the boot disk size to 100GB, which is a good starting point. In fact, boosting your storage won’t be very costly.
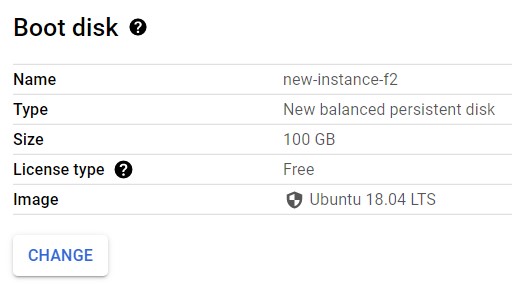
If you’re considering integrating GPUs into your instance, it’s recommended to switch the default boot disk from Debian to Ubuntu.
Ubuntu simplifies the installation of proprietary software drivers and firmware, making the process of installing necessary NVIDIA drivers for GPU utilization significantly smoother. This could save you time and effort in the long run. We will cover this topic later.
Firewall Rules
As you scroll down, you will find the Firewall Rules section. Here, you will see the default settings that manage your network traffic flow. HTTP or HTTPS? Go for HTTPS whenever you can. It’s the safer bet, wrapping your data transfers in an encryption layer for added security.
However, many developers activate both HTTP and HTTPS for broader compatibility, handling secure (HTTPS) and insecure (HTTP) requests alike. But let’s keep it modern and secure, HTTPS should be your go-to, especially when handling sensitive data.
 Warning
Custom firewall rules?
Beyond the standard rules, you can also craft custom firewall rules in Google Cloud. These can be shaped to match your individual security needs and traffic flow. But be cautious, as incorrect firewall configurations can either expose your instance to threats or obstruct valid traffic.
Since we’re not handling sensitive data in this example, we’ll be activating both.

After fine-tuning your instance’s setup and firewall rules, you can go ahead and establish the instance. Take into account that the instance will start automatically after you create it. So if you won’t inmediately need it make sure you stop it.
Establish your environment using Docker
At this point, we strongly recommend you set up Docker as a great tool to easily deploy your projects and environments within your newly created virtual machine. If you are not familiar with the advantages that Docker offers in terms of productivity and open science value for your project, check out our building block on Docker for reproducible research
You can check Docker’s setup process in a Google Cloud virtual machine by visiting this building block, where you’ll find more details as well as a setup script that will get you Docker up and running in your virtual machine in the blink of an eye. After you’re done, come back here to move on to the next step.
Install the NVIDIA drivers and container toolkit
If your instance includes GPUs, you need to install the appropriate NVIDIA drivers to be able to use them. These drivers are specialized software components designed to allow the operating system and other software applications to effectively communicate with and leverage the capabilities of NVIDIA GPUs. Installing the correct drivers is essential to unlocking the full potential of the GPU, whether it is for computational tasks, deep learning applications, or graphics rendering.
Besides the regular drivers, if you have your project containerized within Docker or, more generally, you intend to make use of your instance’s GPUs from within Docker containers, you need to install the NVIDIA container toolkit. This toolkit is the key component allowing Docker containers within your instance to function taking full advantage of all the benefits that Google Cloud machines of the GPU family offer. You can check the detailed instructions on the NVIDIA container toolkit site.
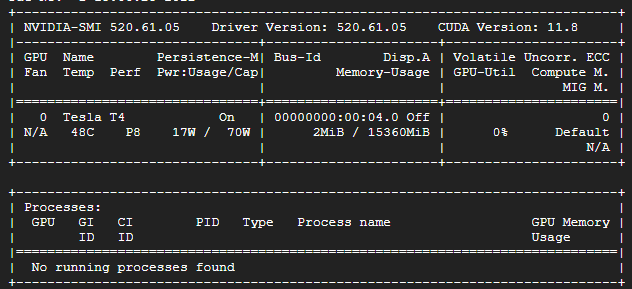
After completing the installation process of the NVIDIA container toolkit, you can run the following in your virtual machine terminal to check if the installation was successful. In that case, you will see in your command line something resembling the image below.
Confirm GPUs availability
To ensure that GPUs are accessible for your tasks, you can use specific commands depending on the framework you’re using.
For instance, let’s say you’re working on a Python deep learning project. If you are using PyTorch, the following command can be used to check if CUDA (GPU acceleration) is currently available, returning a boolean value.
If you are working with other common deep learning libraries like Tensorflow, you could verify it this way:
import tensorflow as tf

physical_devices = tf.config.list_physical_devices('GPU')
if len(physical_devices) > 0:
    print("GPUs ready!")
else:
    print("GPUs not available")
Bear in mind that the particular framework you are using within your project, such as Pytorch or Tensorflow may have specific additional requirements to make use of your machine’s GPUs on top of the ones already presented in this building block.
 Tip
TipWorking with heavy files or having memory issues?
Your Virtual Machine can be monitored, this will be useful especially when the tasks you are running are memory-demanding.
Also, oftentimes you’ll be working with large files and you’ll need to use the so-called “buckets” to access extra storage. The ways to establish the connection with them might not be that intuitive, but luckily for you, you’ll learn these and more useful skills in our next building block on the topic!
 Summary
-
Google Cloud VM Setup:
- Register on Google Cloud.
- Create a Virtual Machine that satisfies your computational power needs.
- Select the most appropriate Boot Disk and Firewall Rules
-
Enable reproducibility and access the GPU power
- Install Docker on the VM to aim for reproducibility.
- Install NVIDIA drivers and the container toolkit for GPUs
- Confirm GPU availability
Additional Resources
- Google Cloud Compute Engine guides
- CUDA Toolkit download
- PyTorch Documentation
- Tensorflow Documentation


