


Overview
Avoid headaches regarding compatibility and installations by sharing your project's environment as a Docker image that can be easily imported by your peers and collaborators from Docker Hub and deployed in minutes.
In this building block, we'll walk you through the steps to containerize a Python-based project environment using Docker. Once set up, you'll be able to launch a Jupyter Notebook within this containerized environment. This is especially handy when you want to share a sophisticated environment (e.g., with certain software and packages installed) with collaborators, allowing them to dive right into a familiar Jupyter Notebook workspace.
Along the way you will be provided with templates to create the two key elements of this process:
-
A
dockerfile, containing the instructions to replicate your environment as a Docker image. -
A
docker-compose.ymlfile, containing a series of aditional instructions to allow you to easily interact with your containerized environment throguh Jupyter Notebook and retrieve files from it.
Additionally, you will
- discover Docker Hub, a platform to easily share you project's environment image, making it readily available to anyone willing to replicate it, and
-
use docker volumes - a file storage that is sychronized between your container and your computer's file system (so that the files you generate are actually accessible to you later!).
 Tip
TipNew to Docker?
If you haven't installed docker on your computer yet, you can see how to do it on the building block on how to set up Docker.
In case you are new to Docker we recommended you to review some of the basics of Docker before going ahead with this building block by visiting TSH's building block on Docker for reproducible research.
Your environment's dockerfile
The starting point of any Docker image is a dockerfile, which in this case will contain the instructions to set up in place all the dependencies associated with your environment.

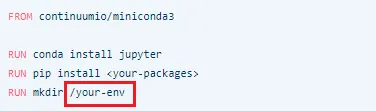
# Set base image
FROM continuumio/miniconda3

# Install Jupyter notebook
RUN conda install jupyter

# Install environment packages
RUN pip install pytest

# Create new directory within the container
RUN mkdir /your-env
As with any dockerfile, the example above starts with the FROM instruction, which indicates which parent image is going to be used. In this case, the parent image is a popular one that comes with Miniconda pre-installed, a minimalist version of the Python distribution platform for data science Anaconda.
One of the main advantages of employing this parent image is that it will already contain the elemental components to run Python on it without including too many additional elements which may not be of interest for a particular project and could make the container unnecessarily large.
TipDocker offers you more
In this building block, we will focus on exporting a project environment comprised by Python libraries as a simple but really practical example of project containerization with Docker.
However, one of Docker's most powerful features is that it allows you to package your entire project environment, going far beyond just code libraries. You can learn about these advanced features by visiting Docker's official documentation.
After that, the RUN instruction, which is used to execute commands within the container, is employed to install Jupyter Notebook as well as any packages that are necessary to replicate your environment. In this particular example and for the sake of illustration, the pytest package is the only one that is going to be downloaded. Note that miniconda includes already some of the most widely used Python packages such as Numpy and Pandas.
Lastly, the RUN instruction is employed again to create a new directory within the image's container that will be used to connect the container filesystem with your pc filesystem. Don't worry if you don't fully grasp this now, you will come back at this later in the building block.
Feel free to use this example dockerfile as a template to export your environment. For that, you should add to it the name of the packages included in your environment (instead of the included pytest) and save it as a text file without an extension named dockerfile.
 Warning
The file should be named dockerfile not dockerfile.txt or anything else, otherwise docker will not recognize it.
FROM continuumio/miniconda3

RUN conda install jupyter

RUN pip install <your-packages>

RUN mkdir /your-env
Specific versions
If your environment requires you to install a specific version of a package you can use pip install <package>==<version> after the RUN instruction in the dockerfile instead of the regular pip install <package> (e.g. RUN pip install pytest==7.0.1).
Once your dockerfile is ready, open the command line in the directory where it is located and run:
docker build -t <your_image_name>
Docker builds images from a dockerfile and its context (i.e. files located alongside the dockerfile), thus it is generally recommended to place your dockerfile in a directory dedicated to storing the dockerfile itself and its context to ensure the building process can be completed smoothly.
If you are building an image for an environment where the dockerfile will mostly cover the installation of the appropriate packages and no contextual actions will take place (as this example), just place it in an empty directory. However, bear in mind this may not always be the case.
After having done this, Docker will have generated an image (i.e. a model of your environment) from it, which is now ready to be exported shared through Docker Hub!
This image will be identified by the name you decided to give to it after the flag -t as well as by an alphanumerical image ID of 12 characters assigned automatically by docker.
TipYou can see a list of all your images and the details about them by running docker images in your command line.
Pushing your image to Docker Hub
Docker Hub is the most popular platform for hosting and distributing Docker images, which are organized in repositories. One of the advantages of hosting your container image on Docker Hub is that anyone willing to use it (i.e. replicate your environment in this case) will be able to do so remotely simply by pulling from their command line.
We encourage you to share your images thorugh Docker Hub due to its simplicty and versatility. However, you can also distribute your dockerfile to collaborators. If you choose this route, they'll need to build the image themselves using the docker build command you've just learned about.
TipBefore you try to push your image make sure you are properly logged in to your Docker Hub account. To do that run docker login in the command line and then introduce your Docker Hub username and password.
A Docker Hub repository is designed to contain one or multiple versions of a Docker image, which are differentiated by their tag. Optionally, it is recommended that you assign an appropriate tag to each of your images within a repository so you can appropriately differentiate them. However, you don't have to worry if you don't do it, in that case Docker will simply automatically assign the "latest" tag to the last build of your image. To assign a tag to your recently built image you should type the following in the command line:
docker tag <image_id> <your_image_name>:<tag>
Remember
The image ID is the unique 12-character string associated with each image. Do not confuse it with the name of your image.
Also bear in mind that the default name of your repository will be your Docker Hub username plus "/" and the name you assigned to the image. (i.e. repository name:
Once you have assigned a tag to your image, it is time to push it to Docker Hub using the docker push command by typing:
docker push <your_image_name>:<tag>
Et voilà! Your image is now on Docker Hub ready to be employed by other users.
Getting your image from Docker Hub
At this point when your environment's image is already available on Docker Hub, getting it will be as simple as using the docker pull command to tell docker that you want to import a given image from a Docker Hub repository. The resulting command line sentence to run will be:
docker pull <repository_name>:<tag>
 Example
Imagine a fictional repository created by the fictional user "mickey_docker" for hosting the different versions of the image "mickeys_environment". The first version of the image has been recently built and now that it will be pushed to Docker Hub, this user will assign an appropriate tag to it (e.g. "1.0") by running:
shell
docker tag 123456789abc mickey_docker/mickeys_environment:1.0
Then, to push it, this user will execute the following in the command line:
shell
docker push mickey_docker/mickeys_environment:1.0
Finally, when a collaborator of this user needs to import the environment's image, by typing:
shell
docker pull mickey_docker/mickeys_environment:1.0
Docker will pull the image and have it ready to be run in a container locally.
Executing Jupyter in your environment
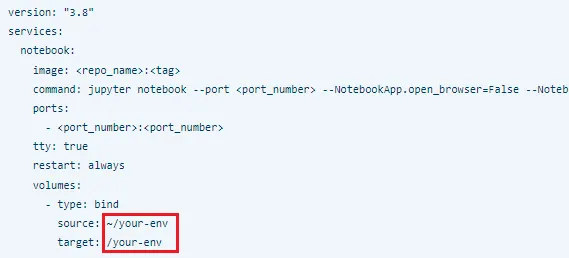
Having successfully pulled your image from Docker Hub, it is time to see how to launch Jupyter within your environment's container and work in it. For this you will employ a docker-compose file, which gives Docker the instructions on how to provide certain services that a container or group of containers may need to work properly.
In this case, those services will consist on the execution of Jupyter Notebook, and the mounting of a docker volume, which is a mechanism to connect a container's filesystem with that of your computer. This will be very useful for cases when you need to move files from and to your environment's container. Below you can see an example docker-compose file which is in charge of these services. Also, If you want to learn more about docker-compose files you can check the official documentation.
-compose
version: "3.8"
services:
  notebook:
    image: <repo_name>:<tag>
    command: jupyter notebook --port <port_number> --NotebookApp.open_browser=False --NotebookApp.ip='0.0.0.0' --allow-root --NotebookApp.notebook_dir=/your-env
    ports:
      - <port_number>:<port_number>
    tty: true
    restart: always
    volumes:
      - type: bind
        source: ~/your-env
        target: /your-env
If you introduce the appropriate repository name, the tag of the image you are interested in, and the port where you want jupyter to be executed (e.g. 4444) this docker-compose will be ready to allow you to work with your imported environment.
Again, feel free to copy it, use it as your docker-compose template, and share it with your colleagues so they can take advantage of it while reproducing your environment!. It has been designed to work properly in conjunction with the dockerfile template provided above by following the steps within this building block. For that you should save it (for example, in the same directory where you placed your dockerfile previously) as "docker-compose.yml", open the command line there and run:
docker compose up
Now you just have to access Jupyter Notebook by clicking on the link generated in your command line, or by copying it into your browser's search bar.

If the execution was successful, once you access Jupyter you will notice that it has been opened in a directory called "your-env". This directory exists in both your local computer and the image's container and is the connection between the two. This is the main function of the Docker volume that was set in the docker-compose and it implies that any file you place on this directory on your pc will be made available also for you to work with it in your environment's container.
Conversely, you can retrieve from the container to your local filesystem any file generated which is stored here. Ideally, here is where you should place the files of your project so you can work with them flexibly.
You can also use any name for this directory where the volume has been mounted (first in the dockerfile and then in the docker-compose) to make it more recognizable to you.
Creating new versions of your images with docker commit
Imagine that during your project, you have started to use a new Python package not included in the original image that you already made available to other users on Docker Hub. In that case, if you have this package already installed in your image's container, you could simply use the docker commit command to create a new version of your image including these changes and then push it. For that you just have to run:
docker commit <container_id> <repo_name>:<new_tag>
As a result, Docker will have created a new image that contains all the newly installed packages which you can push to your repository as previously shown.
Does your project involve computationally demanding tasks?
If your project includes computationally demanding tasks visit our building block on how to Import and run a Python environment on Google Cloud with Docker. Designed in a complementary manner to this building block, you will learn how to import your recently containerized project and how to interact with it through Jupyter Notebook on a Google Cloud virtual machine, a process that features some key differences compared to the steps presented in this building block.
In case you are new to these, we also invite you to check out our building block on configuring high-performance Google Cloud virtual machines, a great resource to work on projects that involve computationally demanding and memory-intensive tasks.
 Summary
-
Setting Up Jupyter in Docker: This guide outlines how to set up a Jupyter Notebook server in a Docker container using a
docker-compose.ymlfile, allowing users to work in a reproducible environment that can be easily shared with others. -
Volume Mounting for Easy File Transfer: It highlights the use of Docker volumes to facilitate file transfer between the user's local system and the Docker container, promoting efficient workflow with a project’s files.
-
Creating New Image Versions with Docker Commit: Users learn how to create new versions of their Docker images by utilizing the
docker commitcommand, enabling them to include recent changes such as additional Python packages. -
Resource for Computationally Demanding Projects: For computationally intensive tasks, the guide recommends leveraging Google Cloud virtual machines, and provides resources to learn how to import and run Python environments on Google Cloud using Docker.
Additional Resources
- Learn how to Configure a VM in Google Cloud with GPUs.
- Explore Docker Hub public content.