


Overview
This building block delves deeper into GitHub Actions by providing a hands-on example. We’ll craft a workflow specifically for Python code formatting and testing. After that, you'll discover how to integrate and track it into your own repository.
 Tip
TipIf you are new to GitHub Actions, we suggest you review Introduction to github actions building block first to get familiar with the foundational concepts.
Hence, by the end of this block, you will:
- Know how to set up a GitHub Actions workflow for code formatting and testing.
- Learn how to monitor your workflow from the GitHub interface.
Building a GitHub Actions Workflow
In this section, we're going to build upon the .yml file structure introduced in the previous guide.
To illustrate a useful workflow example, our goal would be to integrate code formatting (using Super Linter) and code testing.
In case you're interested, the example was based on the following GitHub repository:
Code Formatting with Super Linter
The Super Linter action is a simple combination of various linters to help validate source code. It works automatically whenever your workflow is activated by an event, like pushing new code.
Super Linter will check the new code to make sure it follows the correct coding rules and guidelines. This helps keep your code clean and easy to understand.
Here’s a breakdown of the .yml configuration for the code formatting job using Super Linter:

# This section defines the list of jobs to run
jobs:
  # The first job is named 'format-check'
  format-check:
    # Specifies which operating system to run the job on
    runs-on: ubuntu-latest # This will run on the latest version of Ubuntu hosted by GitHub

    # Determines how the job behaves if a matrix strategy is used (not used here, but kept for context)
    strategy:
      fail-fast: true # If any step fails, stop the entire job immediately

    # List of sequential steps within this job
    steps:
      # The first step checks out your repository's code to the runner's environment
      - name: Checkout
        uses: actions/checkout@v3 # GitHub Action that checks out your code

      # The second step runs the Super Linter to validate code formatting and linting
      - name: super_linter
        continue-on-error: false # The job will fail if this step encounters an error
        uses: super-linter/super-linter@v5.0.0 # Specifies the version of Super Linter to use
        env: # Environment variables for this step
          DEFAULT_BRANCH: main
          VALIDATE_PYTHON_MYPY: true # Enables Python type checking with mypy
          VALIDATE_PYTHON_BLACK: true # Enables Python formatting with Black
          VALIDATE_PYTHON_ISORT: true # Enables Python import sorting with isort
This portion first checks out the code from the repository using actions/checkout@v3. After that, it uses the Super Linter action to validate the code. The environment variables under env specify the configuration for Super Linter.
Code Testing with pytest
After code formatting, it's important to ensure that your code functions as expected. One popular tool for testing Python code is pytest.
TipWhy testing?
Testing ensures that your code works reliably under different scenarios. It helps in identifying bugs early, preventing unexpected failures, and improving code quality.
Automated testing in a CI environment, like GitHub Actions, verifies that changes and additions haven’t broken existing functionality. For more insights, check this site.
Below is the configuration for the testing section of our workflow:
# The second job is named 'code-testing'
code-testing:
  # This job will only run if the 'format-check' job succeeds
  needs: format-check

  # Specifies which operating system to run the job on
  runs-on: ubuntu-latest # This will run on the latest version of Ubuntu hosted by GitHub

  # Determines how the job behaves if a matrix strategy is used (not used here, but kept for context)
  strategy:
    fail-fast: true # If any step fails, stop the entire job immediately

  # List of sequential steps within this job
  steps:
    # The first step checks out your repository's code to the runner's environment
    - name: Checkout
      uses: actions/checkout@v3 # GitHub Action that checks out your code

    # The second step runs tests using pytest
    - name: Run tests
      run: pytest # Command to run pytest to execute tests
This portion again checks out the code and then runs pytest to execute tests present in your repository.
Integrate it into your Repository
To incorporate this workflow into your repository:
- Make sure you have a GitHub repository with some Python code to review.
- Create a
.github/workflows/directory at the root of your repository. - Save the full
ymlfile into a file, e.g.,formatting-testing.yml. -
Push your changes to the repository. GitHub will automatically detect the workflow and run it based on the specified events.
TipStart Simple
Don't worry if you don’t have tests for pytest to run. Begin with the code formatting job, it's a great introduction to GitHub Actions.
Tracking Workflows
Once you have set up and activated your workflow, you can monitor and manage its execution directly from GitHub's user interface:
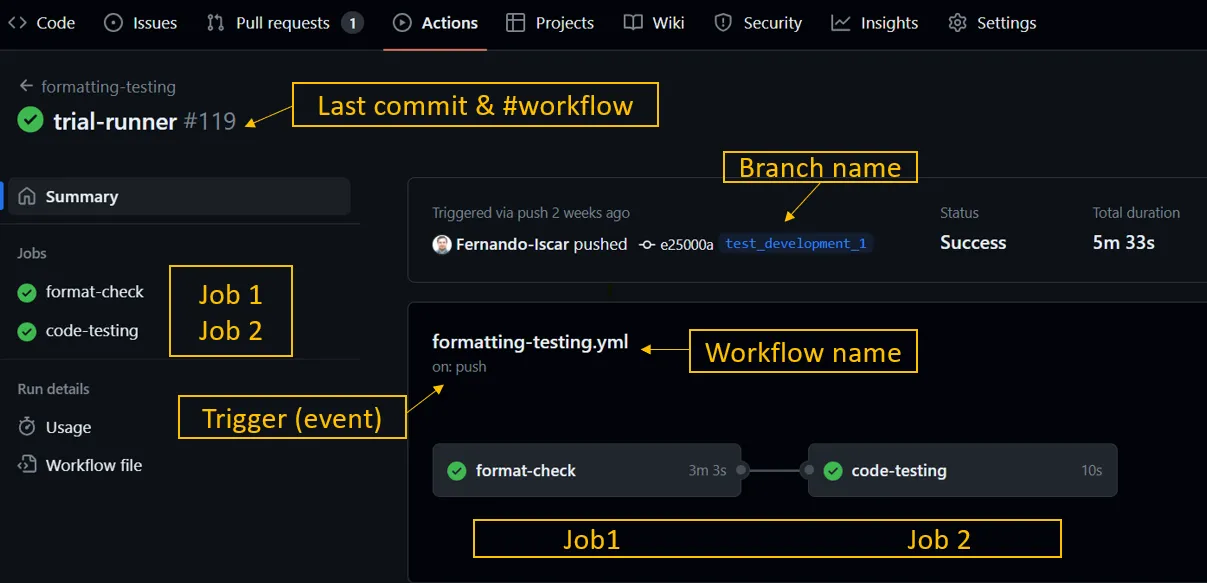
1. Accessing GitHub Actions
Go to your repository on GitHub. Click on the 'Actions' tab, located between the 'Pull requests' and 'Projects' tabs.
2. Check out your workflows
You’ll see a list of all the workflows in your repository whose titles will correspond to the latest commits.
You can see the status of each workflow (e.g., in progress, successful, failed) along with a brief description and the execution duration. On the right side, you can filter these by 'Event', 'Status', 'Branch' or 'Actor'.
Click on the name of the workflow you want to explore to view more details. Here you will find a list of all the jobs within the workflow, along with their individual status.
3. Investigating a Specific Job
Clicking on a specific job allows you to access a more detailed view. Here you can see each step within the job, the time taken for each step, and execution logs. This is what you should do when you want to check why a job failed, as shown in the picture below:

GitHub hosted runner vs self-hosted runners
In GitHub Actions, besides using GitHub-hosted runners to execute your workflows, there’s also an option to use self-hosted runners.
A self-hosted runner is a server set up by you, where jobs from your GitHub Actions workflows can be executed. This allows for more customization and control over the environment where your code runs, enabling you to ensure that the runner meets the specific requirements of your project, thus potentially improving the performance and consistency of your CI/CD setup.
If you're interested in learning more, follow our next building block on the topic!
 Summary
With GitHub Actions, you can automate code formatting using tools like Super Linter and integrate testing with tools like pytest.
By structuring your workflow correctly with a .yml file and placing it in the .github/workflows/ directory, GitHub can automatically process your workflow, ensuring code quality and functionality every time you make changes to your repository.
Additional resources
- GitHub Actions Marketplace
- Super Linter Documentation
- Pytest Documentation