


Overview
This building block will introduce you to self-hosted runners for GitHub Actions, their advantages, and the process of setting up a self-hosted runner for your GitHub Actions workflows. For that you will be presented with two setup approaches, the standard one, and our recommended Docker-based approach. Moreover, the basic aspect of self-hosted runners' operation is also reviewed so you know what to expect and how to use them once configured.
Introducing GitHub Actions self-hosted runners
If you have some degree of familiarity with GitHub Actions, you may already have an intuition of what is the role of runners in executing a workflow. Conversely, if you are new to the concept, or you feel that a brief refresher could be useful, consider the following fragment from our introductory building block to GitHub Actions:
"runners are the servers where the jobs are executed once a workflow is triggered. GitHub offers runners based on Linux, Windows, or macOS."
Therefore, every task considered within your workflows is executed inside a runner, which can be intuitively understood as a system/machine designated to carry out your workflow(s) or parts of it. By default, these are pre-configured runners hosted by GitHub. While GitHub's runners provide numerous benefits such as immediate availability and user-friendliness, they also present constraints in terms of customizability and computational capacity. In other words, you may find that your project's workflows require some components not easily manageable within a GitHub-hosted runner, or they involve computationally intensive tasks that a GitHub-hosted runner simply cannot handle. For such scenarios, GitHub provides the alternative of configuring a runner of your own inside your PC or on any machine to which you have access. This way, a self-hosted runner can take advantage of the available resources, components, and dependencies already present on your PC or the system where it is set up, to run your workflows more efficiently or circumvent the limitations of GitHub-hosted runners.
Setting up your self-hosted runner: The standard approach
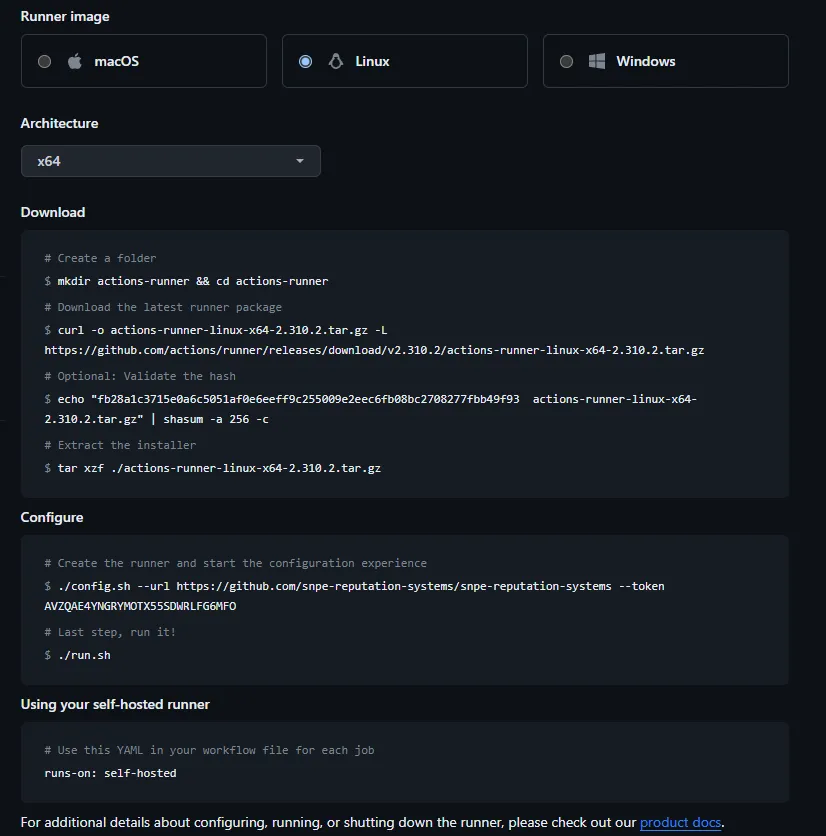
Once inside the repository for whose workflows you would like to configure a self-hosted runner, you can find the instructions to do so by clicking on the 'Settings' tab. Then, on the left-hand panel, select 'Actions' and then 'Runners'. Here, locate and click on the green 'New self-hosted runner' button located at the upper right corner of the screen. There you will find the basic command line instructions to configure a self-hosted runner for macOS, Linux, and Windows systems (Note that in this building block we will be using the Linux steps as reference). By executing the provided commands you will get your self-hosted runner configured. The setup process essentially comprises the following steps:
-
Download the runner package
-
Extract the installer
-
Execute the runner's configuration script
-
Launch the runner
 Tip
TipDuring the execution of the installation script, you will be given the option to introduce through the command line a name for the runner and a series of labels to identify it. It is a recommended practice to provide non-default names and identifying tags to your runners if you plan to have multiple of them to make them easily identifiable. However, if you decide not to do so GitHub will provide a generic name and labels to your newly-configured runner.
As you may see, the configuration process is quite intuitive and user-friendly. However, there is a detail in the "configure" section of the instructions which is worth a closer look. As shown below, when the runner configuration script config.sh is executed, two arguments must be provided: "url" and "token". "url" simply refers to the repository to which you wish to link your new self-hosted runner. In the image below, the URL of a sample repository is displayed, and it is crucial to remember that this should be substituted with the URL of your own project's repository. Regarding "token" this is a single-use token required to configure the runner and set it up. This token is dynamically generated every time you access the 'New self-hosted runner' page within your repository. Consequently, whenever you wish to configure a new self-hosted runner you must visit this page to get a new token.
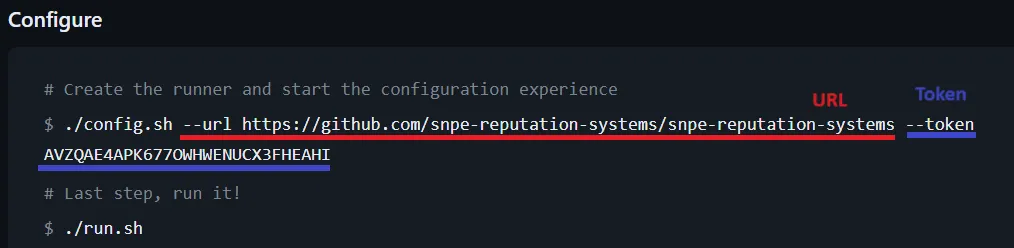
TipWhile the self-hosted runner setup instructions stay largely the same, some details are subject to change in each setup, including the repository URL, token, or even the runner package version. Thus we recommend you to copy these instructions directly from the 'New self-hosted runner' page of your project's repository which is automatically updated with the appropriate information every time you visit, guaranteeing a smooth and successful setup process.
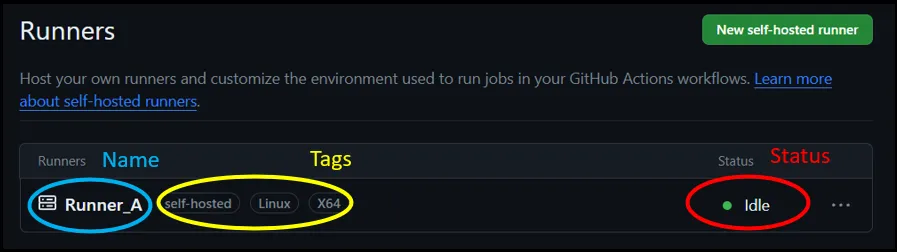
You should see something like the image below in your command line after the execution of the last step of the configuration process (./run.sh), meaning that the runner setup was successful and that the runner is currently online and ready to be assigned to tasks.

Using the runner
With your runner appropriately configured, to activate it you just have to execute the script in charge of such action (run.sh) emulating the last step of the installation process. While active, the runner will remain "listening for jobs", waiting for the execution workflow containing jobs that can be assigned to it. Conversely, you can stop the running by pressing Ctrl + C^.
To assign a workflow to a particular runner, you must mention at least one of its assigned labels after the runs on: instruction a workflow's job. Once a workflow is triggered, GitHub Actions will look for runners with labels matching those specified after runs on: in each of its jobs. If none is found, the job will be queued until a runner with a matching label/set of labels becomes available.
TipBear in mind that if a self-hosted runner is inactive for 14 days straight, it will be automatically deleted by GitHub and you will have to repeat the setup process if you want to use it again.
Setting up your self-hosted runner: Our recommended Docker-based approach
The steps previously presented constitute the standard procedure for configuring a self-hosted runner. However, we advocate for a Docker-based approach to the setup process that offers several advantages. By encapsulating the runner in a Docker container, you create a controlled environment, free from inconsistencies and potential dependencies' conflicts. This not only makes the setup process smoother but also ensures that the runner operates in a stable manner. Additionally, the Docker-based approach significantly simplifies the deployment of the runner, as well as the instantiation of additional runners or "clones" of it if necessary, providing a streamlined and efficient scaling process.
TipBy visiting our Docker introductory building block you will learn more about its advantages and basic functioning, which will also help you get a better grasp of what is happening behind the scenes during the self-hosted runner setup process! Analogously you may also find it interesting to check other Docker use cases that we have previously covered at Tilburg Science Hub.
With this Docker-based approach, the self-hosted runner will be established inside a Docker image through its Dockerfile by adapting the standard self-hosted runner configuration steps introduced in the previous section. For that, we provide you with a Dockerfile template which you can access by clicking the following or copying directly from the codebox below. Feel free to adapt it and use it yourself!

FROM continuumio/miniconda3

RUN mkdir actions-runner; cd actions-runner && \
    apt-get update && apt-get install -y curl

WORKDIR /actions-runner

RUN curl -O -L https://github.com/actions/runner/releases/download/v2.304.0/actions-runner-linux-x64-2.310.2.tar.gz && \
    tar xzf ./actions-runner-linux-x64-2.310.2.tar.gz && \
    ./bin/installdependencies.sh && \
    useradd -m runneruser && \
    chown -R runneruser:runneruser /actions-runner

USER runneruser

RUN  ./config.sh --url <REPO_URL> --token <TOKEN> --unattended --replace --name <RUNNER_NAME> --labels <LABELS>

USER root

RUN pip install <RELEVANT_DEPENDENCIES_FOR_YOUR_RUNNER>

USER runneruser

RUN chmod +x /actions-runner/run.sh

ENTRYPOINT ["/actions-runner/run.sh"]
As you may have noticed in the Dockerfile template, there are some placeholders that you should replace for it to work properly. REPO_URL and TOKEN correspond to the arguments of the configuration process which are subject to change reviewed in the previous section. Meanwhile, RUNNER_NAME and LABELS intuitively capture the name that you want to give to the runner, and the labels that you wish to assign to it. Given that the configuration process is handled by Docker while using this method, you cannot interactively provide them as done in the standard approach and thus you should specify them beforehand. Finally, RELEVANT_DEPENDENCIES_FOR_YOUR_RUNNER should be replaced by the dependencies that are relevant to the operations that will be conducted within your new self-hosted runner. These will be installed inside the docker container and thus will be made available automatically to your runner.
 Example
Imagine that you are building a GitHub Actions workflow for code formatting and testing like the one presented on our building block on the topic. In that case and assuming that your project does not require any additional dependencies not installed by miniconda, your relevant dependencies would be the testing framework Pytest and the code formatters Black, Isort and, Mypy. Consequently, line 19 of the Dockerfile would look as follows:
RUN pip install pytest black isort mypy
Note: The template Dockerfile was designed for Python-based projects, including a Miniconda base image (FROM continuumio/miniconda3) and "pip" as the dependency installer (RUN pip install ...). However, by adapting these two lines of the Dockerfile at your convenience you can make it work for projects based on other languages/frameworks.
Using the runner through Docker
The only difference regarding the use of a self-hosted runner when configured through a Dockerfile as proposed in this approach is related to how to start and stop it. Instead of running the script run.sh to start the runner, you should start the image's container where it was set up. The ENTRYPOINT instruction of the Dockerfile will ensure that each time that the image's container is started the runner is started as well. Analogously, to stop the runner, simply stop the container.
 Summary
-
Self-hosted runners are the alternative to GitHub-hosted runners to run your GitHub Actions workflows, offering more customizability and potential computational capacity.
-
To set up a self-hosted runner you can follow the instructions found inside a repository's settings tab in 'Actions' > 'Runners' > 'New self-hosted runner'.
-
Alternatively, you can take advantage of Docker's advantage by setting your Self-hosted runner inside a Docker container by implementing the setup instructions in a Dockerfile and having your runner inside a Docker container.
-
Self-hosted runners must be Started/Stopped manually.