


Overview
When cloning a repository or new branch, the timestamps of the files correspond with the time when we cloned the repository, not when they were originally committed. This may cause problems downstream, for instance, when we use Git in combination with make to automate a workflow. With Git tools we can revert the timestamps of our local cloned files to the original time of their commit. Specifically, we use git restore-mtime to do this change.
In this building block, we will lead you step-by-step toward the end goal of retoring the time stamps of your files to the original time of their commit:
- Install Git tools
- Restore repository time stamps
- Example
1. Install Git tools
1.1 Linux and Mac users
For Linux and Mac platforms, we follow the instructions of the README file from Git tools repository, but for Windows, we need to take a somewhat different approach.
1.2 Windows users
The first thing we need to do is to clone the Git tools repository. Next, we need to make sure our computer meets the following requirements:
- Git
- Python
- pip
- setuptools
- pyinstaller
As mentioned in the README of the Windows installation, to upgrade pip and setuptools to the latest versions we can use:

pip.exe install --upgrade --trusted-host pypi.org --trusted-host files.pythonhosted.org pip setuptools
To install the latest version of pyinstaller we need to run:
pip.exe install --trusted-host pypi.org --trusted-host files.pythonhosted.org ^
    https://github.com/pyinstaller/pyinstaller/archive/develop.tar.gz
Then, we need to run the Windows executable file from the Windows folder of the repository: build_windows_executable.bat. If everything is successful, there should be a new file created: dist/git-restore-mtime.exe.
Lastly, we need to add the path of the Git tools repository to the PATH system variables.
2. Restore repository timestamps
After installing Git tools, we can use the function git restore-mtime to restore the timestamps of a cloned repository to the original timestamps of their commit. For this, simply navigate to the root folder of the wanted repository and type in the Command Prompt:
git restore-mtime
Now all the times are restored.
Additionally, if we want to first preview the changes of this function, we can use:
git restore-mtime --test
3. Example
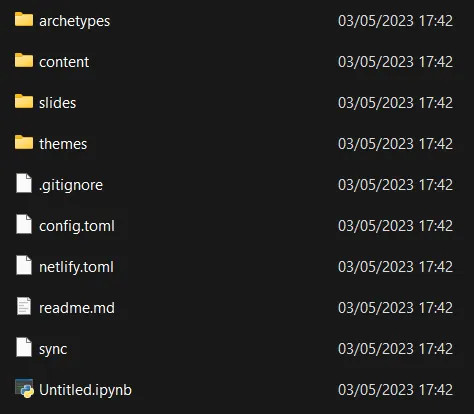
For this example, we use the repository of the Online Data Collection and Management course to test the function. To clone the repository type git clone https://github.com/hannesdatta/course-odcm in the Command Prompt opened in the destination folder.
We notice that the timestamps of the files correspond to when we cloned the repository locally.
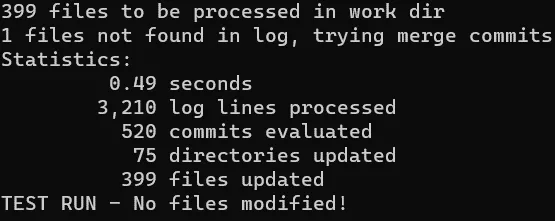
After typing git restore-mtime --test in the cmd opened in the root folder of the repository, we get an overview of what changes would take place:
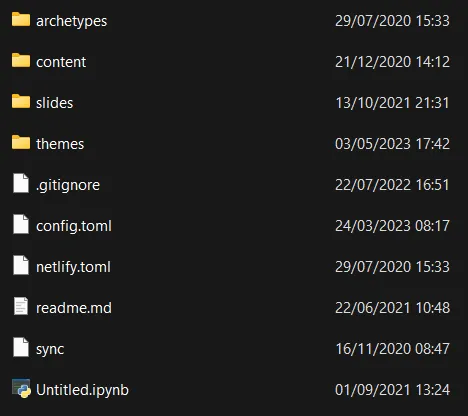
Once we run git restore-mtime, all the timestamps of the files are changed to the original commit times.
 Summary
In this building block, you learned how to restore the timestamps of a cloned repository to the original timestamps of their commit. First, you have to install Git tools. Then, with the single command git restore-mtime you can restore the timestamps.