


Introduction
This building block aims to enhance your development process by illustrating the synergistic relationship between GitHub and Google Colab. It's designed for students and researchers looking to optimize their workflow for more efficient and collaborative project management.
 Tip
TipIf you're a newcomer to Google Colab, might be worth to give a read to this short introduction before diving into its integration with GitHub.
By the end of this guide, you will:
- Understand how to import GitHub repositories into Google Colab.
- Be familiar with executing Git commands and pushing changes directly from Colab.
- Learn strategies to handle large files.
Setting Up the Workspace
Importing GitHub Repositories into Colab
Colab offers a seamless method to clone your GitHub repository into the environment, allowing you to work directly on your projects without switching platforms. This integration simplifies accessing and working on your code.
To set up the workspace, you'll first need a GitHub repository to work from, which can be either public or private. Also, make sure you are logged in into your Google Account. Then, do the following:
1. Go to Google Colab and click on 'Open Colab'.
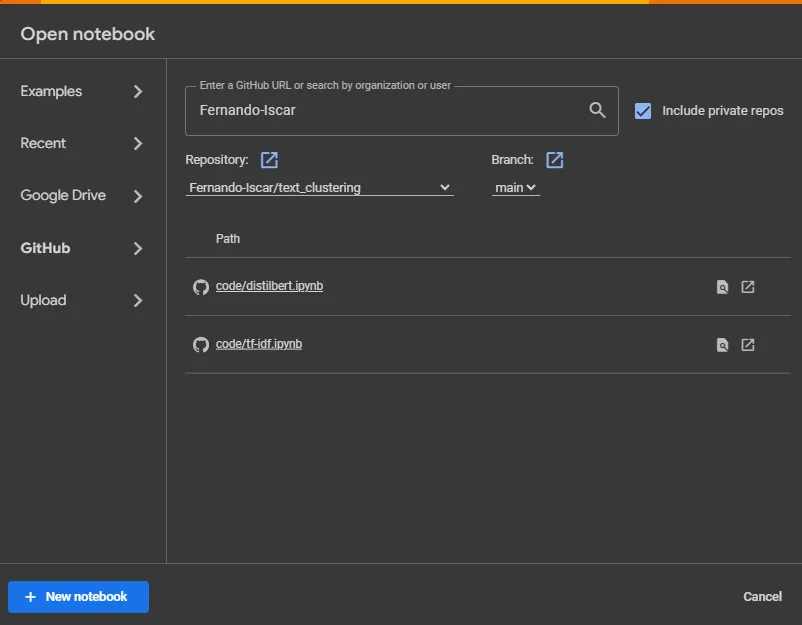
2. In the 'File' menu, select 'Open notebook', then go to the 'GitHub' tab. You can enter the URL of your repository or search for it using your GitHub username. Include private repositories if necessary by clicking on the respective option.
3. After finding your repository, click on the notebook you want to open.
Once you have the notebook open in Google Colab, you can start working directly on it. However, if you need access to other files or directories within your GitHub repository, like a dataset, cloning it might be necessary. This can be done by executing a git clone command in a cell:
bash
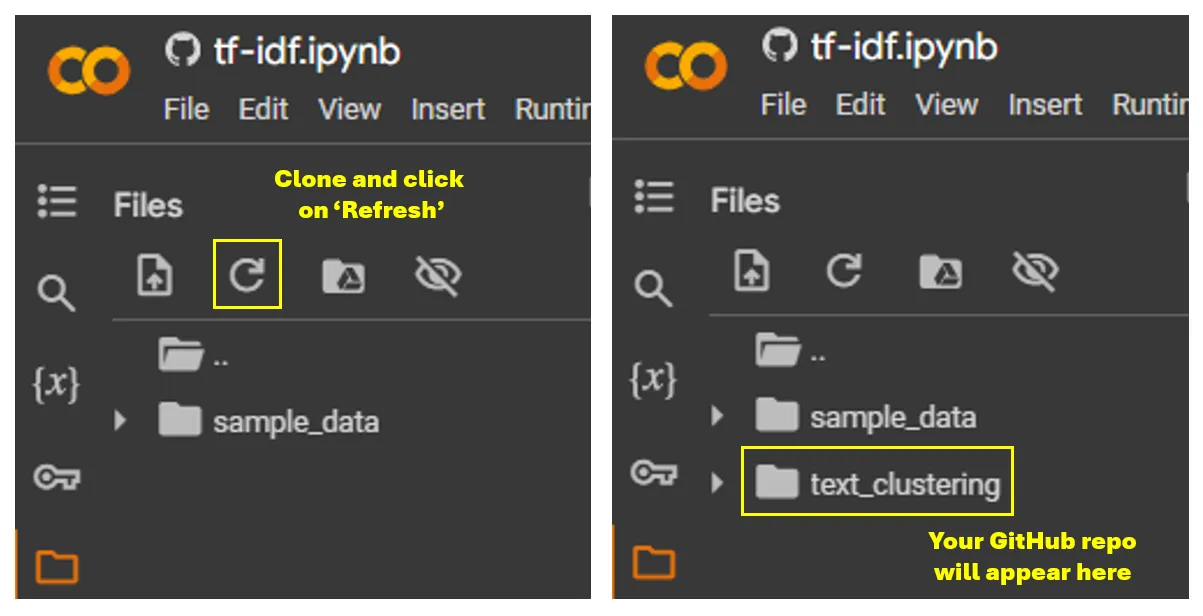
!git clone https://github.com/your-username/your-repository.gitAfter doing this, go to the files tab and press the refresh button, as shown below:
 Warning
Cloning private repos
If you want to clone a private repository, you will need to provide your GitHub username and password. To do this securely, you can use Git credentials or SSH keys. Here's how you can clone a private repository using Git credentials:
- Generate a personal access token (PAT) on GitHub. You can follow the instructions here to generate a PAT.
- In the Colab notebook, execute the following command, replacing
your-usernameandyour-repositorywith your GitHub username and repository name:
bash
!git clone https://your-PAT:x-oauth-basic@github.com/your-username/your-repository.git
Working with GitHub in Colab
Executing Basic Git Commands
Google Colab's environment allows for the execution of Git commands, enabling version control operations directly within your notebook. This feature is crucial for tracking changes, managing branches, and collaborating on projects hosted on GitHub.
Some of the basic Git commands you can execute in Colab include:
!git statusto check the status of your repository.!git add .to stage all changes in the repository.!git commit -m "Your commit message"to commit the staged changes.!git pushto push committed changes to the remote repository.
Using commands within the Colab interface can often be the most straightforward method for certain tasks, such as cloning a repository. However, depending on the situation, utilizing the features of either GitHub or Colab may offer the most convenience and efficiency. For detailed guidance on employing git commands within Colab, please refer to this article.
Pushing Changes Using the Colab Interface
In addition to executing Git commands directly in Colab, you can also use the Colab interface to push changes to your GitHub repository. This provides a more user-friendly and visual way to manage your commits and push them to the remote repository.
To push changes using the Colab interface, follow these steps:
- Make sure you have made the necessary changes to your notebook or files.
- In the Colab menu, click on 'File' and select 'Save a copy in GitHub'.
- A dialog box will appear, allowing you to specify the repository, branch, and commit message. Fill in the required information and click on 'OK'.
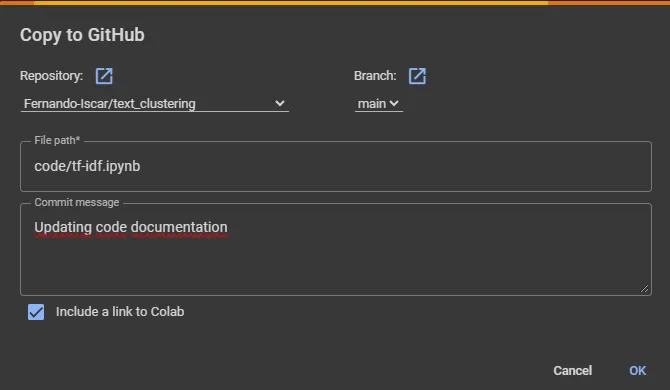
TipTo make it easier for you and your collaborators to access the notebook directly from the GitHub repository, it is recommended to tick the box 'Include a link to Colab'. This way, you can simply go to the notebook file and click on the following icon to launch it:

- Colab will create a new commit with your changes and push it to the specified repository and branch.
Other relevant information
Integrating with Other Google Services
Mounting Google Drive for Persistent Storage
As mentioned in this building block, mounting your Google Drive in Google Colab is a good practice when working with large files. It provides convenient access to files, datasets, and resources stored in your Google Drive within the Colab environment.
Benefits of using Google Drive in Colab include: - Storage of large files that exceed Git repository limitations. - Easy collaboration and sharing with team members or collaborators. - Persistent storage, ensuring accessibility across Colab sessions.
Use Google Cloud Buckets
Another option for storage management in Google Colab is to use Google Cloud Storage Buckets. These are a scalable and durable object storage service provided by Google Cloud Platform. You can find more information in this building block.
Consider sharing with GitHub Gists
Colab also offers the option to save a copy as a GitHub Gist. Gists are ideal for quick sharing, when code is too small for creating a repository, and can be embedded in blogs or documents. Keep in mind:
- Gists are public by default. Use private repositories or Google Drive for sensitive content.
- For creating and managing gists, consult the GitHub Gist documentation.
Leveraging Colab's GPUs
Colab offers free limited access to powerful GPUs, enhancing computational capabilities for data processing and machine learning tasks. To enable a GPU:
- Go to 'Runtime' > 'Change runtime type' in the Colab menu.
- Select 'T4 GPU' as the hardware accelerator and save.
-
Verify GPU activation by executing:
!nvidia-smiin a new cell. This command will output details about the GPU assigned to your session, including its type, memory usage, and the processes running on it. If a GPU is available, you will see its specifications. If not, you might receive an error message indicating no NVIDIA GPU is detected. Summary
This topic covers the steps to clone a repository, work with GitHub in Colab, execute basic Git commands, and push changes using the Colab interface. Additionally, it suggests other resources to enhance the collaboration experience.